
Getting Started With Norva: Your First 10 Minutes
A useful first Norva session confirms account security, source authorisation, catalogue loading, one playback path, and one account-level feature before changing advanced settings.
In short: Use your first Norva session to do five things: confirm what the subscription covers, secure the account, connect one compatible source you are authorised to use, verify a known catalogue item, and test one account-level feature. Ten minutes is a planning timebox, not a loading-time guarantee; some sources or devices may need longer.
A focused setup is easier to diagnose than changing every preference at once. Keep the first session small, record what works, and leave optional customisation until the core path is clear.
Before the clock starts
Prepare:
- access to the official Norva site or app;
- your Norva account details;
- one compatible media source you own or are authorised to use;
- the source’s current connection information;
- one known movie, episode, or live entry for verification;
- a second supported screen only if cross-device use matters now.
Do not expose source credentials in notes or screenshots. Read Norva’s current Terms of Service: the subscription covers the software and features, while the user supplies the authorised source.
Minutes 0–2: confirm account and product boundaries
Sign in through the official interface and confirm that you understand the roles:
- Norva organises and plays a compatible source.
- The source supplies the media and related catalogue information.
- The device and network influence playback and responsiveness.
- You remain responsible for the source and its permissions.
Review the account and privacy controls relevant to you. Norva’s privacy policy explains the use of account data, source settings, history, progress, preferences, and device records.
Do not spend this stage fine-tuning artwork or categories. The goal is a secure, understood starting point.
Minutes 2–4: connect one source
On the web, open your account menu, choose Settings, then TV service. The wording follows your interface language. The add-source dialog offers M3U link and Xtream login: use the format supplied by the owner of your authorised source, not your Norva account password.
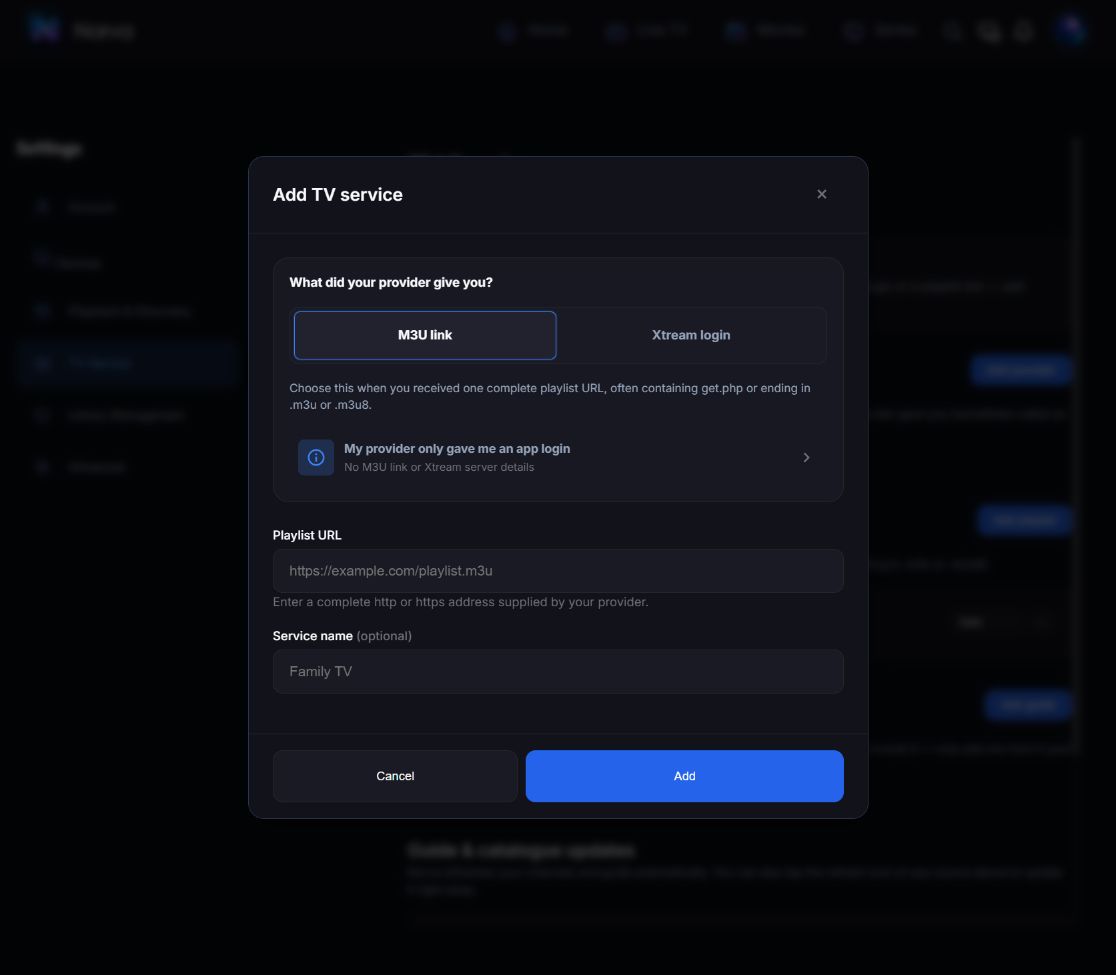
For M3U, the required field is Playlist URL; Service name is optional. If you only received credentials for another application, use My provider only gave me an app login before trying those credentials in a different field. An application login alone does not establish that you have a compatible source.
Connect only one source during the first session. Multiple simultaneous additions make it harder to identify which source produced a category, duplicate, or error.
The field-by-field procedure is How to Connect a Compatible Media Source to Norva.
Observable result: the source is accepted and catalogue preparation begins. Keep any saved source address out of screenshots; reaching Importing is not the same as having a ready library.
In the web test on 10 September 2026, a separate Xtream test connection first reached Preparing your catalog. A later check in Settings → TV Service showed the same source as Ready, without adding it again. The setup used Add this later for the optional access period; no dates or reminder preferences were invented. Ready confirms the catalogue state shown by Norva, not that every file has been played or every track analysed.
Minutes 4–6: inspect the catalogue
Wait for the initial data to reach a stable state. A large or remote source may take longer than the timebox; do not repeatedly restart it.
Check:
- Do the expected top-level sections appear?
- Can you locate one known item?
- Does its title and identity match the source?
- Are categories understandable?
- Are language or subtitle details present only where the source supplies them?
This is not a full library audit. One known item provides a controlled reference.
In the completed catalogue check, Movies → Filters → Source selected the test source. Choosing Albanian under Audio language returned cards carrying that language badge. Clearing the language filter and searching for a known title opened a detail view with twelve versions, a year and a synopsis. These are observed browsing results for one test source, not a full catalogue audit.
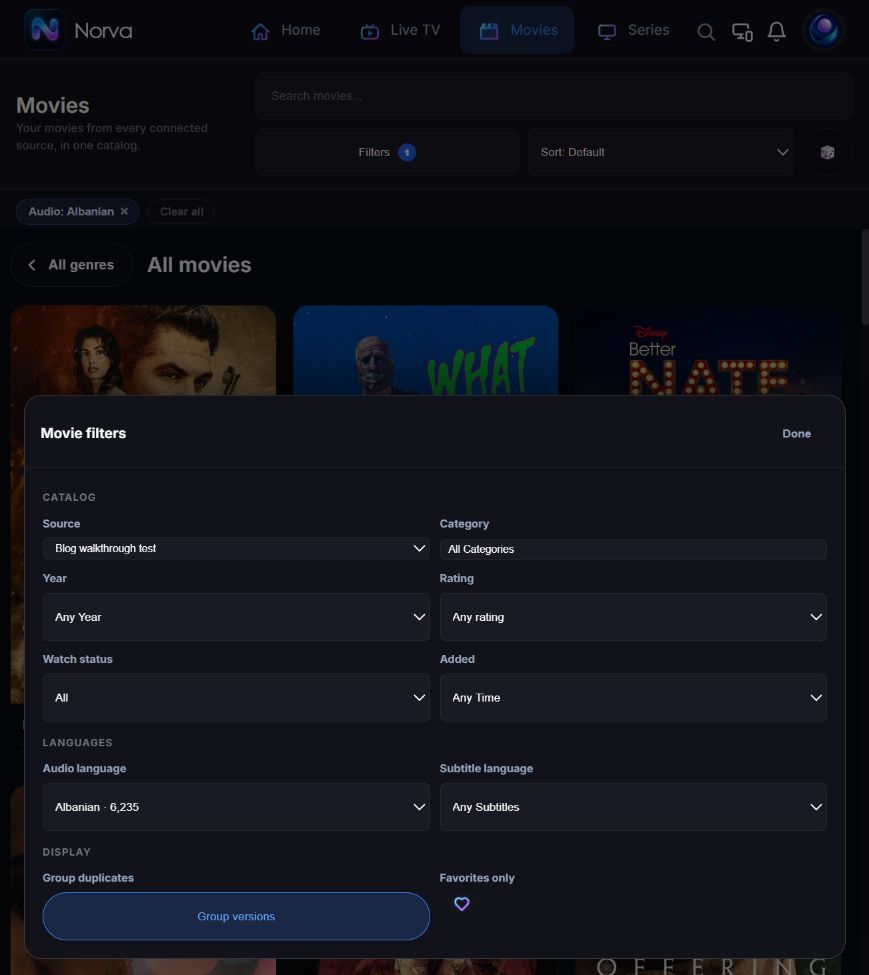
Use Audio language to narrow the list, then inspect the version you intend to play. Language information can come from recognised source labels or detected file tracks; a filter match alone does not prove which tracks your player will expose. Nordic languages is a regional indication, not one specific language. If the result is too narrow, remove the audio chip or use Clear all rather than reconnecting the source.
If the catalogue does not appear, return to the connection guide's partial-result checklist before changing unrelated preferences. Record whether the settings were accepted, any categories appeared, or only one item failed. These observations lead to different next checks.
Minutes 6–8: test one playback path
Open the known item and inspect its details. Select only an audio or subtitle option that is visibly available. Start briefly, then return to the library through the normal control.
Observe:
- whether playback begins;
- whether the expected version was selected;
- whether progress becomes visible;
- whether Back returns to the prior context.
Playback availability and quality depend on source, device, network, and media. A successful catalogue connection does not guarantee every item will play on every device.
Playback was not revalidated in the latest catalogue check. An earlier attempt during setup opened the player but did not establish advancing video before returning Back. Treat playback as a separate checkpoint on your intended device, not as an outcome proved by the screenshots in this guide.
Minutes 8–10: verify one personal feature
Choose one account-level action:
- add a favourite;
- stop at a recognisable progress point;
- select an available language preference;
- review trusted-device information if the current account interface exposes it.
If a second supported screen is ready, follow its on-screen account or pairing instructions and check only that one state. Phone and TV layouts can differ from the web form shown here; do not treat this screenshot as a TV remote-control walkthrough.
Do not attempt a complete compatibility test. Your outcome is a baseline: one source, one item, and one state.
In our web check, a favourite added from the detail page was present on a later catalogue opening. We removed that test favourite and confirmed the original unfavourited state after reload. This checks persistence for one item on one account; it does not establish immediate feedback or cross-device synchronisation.
Record a first-session note
Use five rows:
| Checkpoint | Result | Follow-up |
|---|---|---|
| Account and boundaries | Clear / unclear | |
| Source connected | Yes / no / partial | |
| Known item found | Yes / no | |
| Playback path | Observed / not tested / failed | |
| Account feature | Observed / not tested / failed |
Add the device type, a non-sensitive source nickname, and date. Never copy the source URL or credentials into this note. This is evidence of your own setup, not a public performance benchmark.
Verification scope: checked directly in the signed-in web interface on 10 September 2026: the source forms, one Xtream submission, the later Ready status, source-specific audio filtering, clearing a filter, search, a twelve-version detail view and one favourite's persistence/removal after reopening. Screenshots use English; the final favourite check used the restored device language. Successful playback, immediate favourite feedback, cross-device continuity and native phone/TV behaviour have not been accepted by these checks.
What to postpone
Leave these tasks for later unless they block normal use:
- reorganising every category;
- testing every language;
- adding several devices;
- downloading multiple items;
- comparing rare playback formats;
- changing several filters or preferences together.
A stable baseline makes each later change easier to evaluate.
If the session does not fit ten minutes
Stop at the current checkpoint. Loading time can vary with source size, connection, and device. The title describes a focused orientation, not a service guarantee.
Do not delete the source merely because a first load is incomplete. Record the visible state, check connection details, and use the support route when a reproducible issue remains.
Frequently asked questions
Does Norva include media after I create an account?
No. Norva states that the subscription covers its software and features. You connect a compatible source you own or are authorised to use.
Should I add every device immediately?
No. Establish one working baseline first. Add another supported device when you can verify account state deliberately.
What counts as a successful first session?
A secure account, one connected source, one correctly identified item, and one observed playback or account-state path are a useful baseline.