
How to Connect a Compatible Media Source to Norva
Connect one compatible authorised source through Norva’s current source-management flow, protect its settings, wait for the catalogue to load, and verify one known item before adding more sources.
In short: On the web, open your account menu, then Settings and TV service. Choose M3U link for a complete playlist URL or Xtream login for compatible provider details. Connect only a source you own or are authorised to use, keep its credentials private, and verify one known item before adding more sources. Norva is a player; it does not supply the source or media.
What was checked: on 10 September 2026, we used a signed-in test account in the live web app to inspect the forms and submit one user-provided Xtream test access. A later check confirmed Ready, source-specific language filtering and search opening a twelve-version title. The screenshots are direct, unaltered web captures with no private connection details shown. No M3U import or native phone/TV walkthrough was tested; successful playback remains a separate check.
Before you begin
Confirm all four conditions:
- You control the Norva account.
- The source is yours or you have permission to use it.
- The source terms permit the intended connection.
- Norva currently supports the source’s connection method.
Prepare the official source details directly from the source owner or account page. Do not use settings forwarded without a clear origin.
Read What to Prepare Before Adding Your Media Source for a preflight worksheet.
Step 1: use an official Norva entry point
Open Norva from its official site or installed app. Check the address or application identity before entering account or source information.
Sign in to the intended account and profile. If you are on a shared or borrowed device, do not save private credentials unless the device is trusted and the source terms permit it.
Observable result: the account opens normally and you can reach its source-management controls.
Step 2: locate source management
On the web, open the account menu, choose Settings, then the TV Service tab. These English labels are translated when another interface language is selected. If opening the app lands on Home, follow this menu path; do not assume that a saved source-settings link has opened the correct panel.
Choose Add playlist or Add provider to open the Add TV service dialog. Inside it, the M3U link and Xtream login tabs let you match the form to the information you actually received.
Before entering anything, check whether another source already exists. Adding the same source twice can create duplicate-looking categories and make later diagnosis confusing.
Observable result: an add-source form or supported connection choice is visible.
Step 3: select a documented compatible method
Use the following distinction before pasting anything:
| What you have | Choice in Norva | First check |
|---|---|---|
| One complete playlist address | M3U link | The full URL comes from your authorised source, not an app download page. |
| Compatible server address and credentials, or a full Xtream link | Xtream login | The source owner confirms this format and your permission to connect it. |
| Only a username and password for another app | My provider only gave me an app login | Ask for a compatible source format; do not guess a server address. |
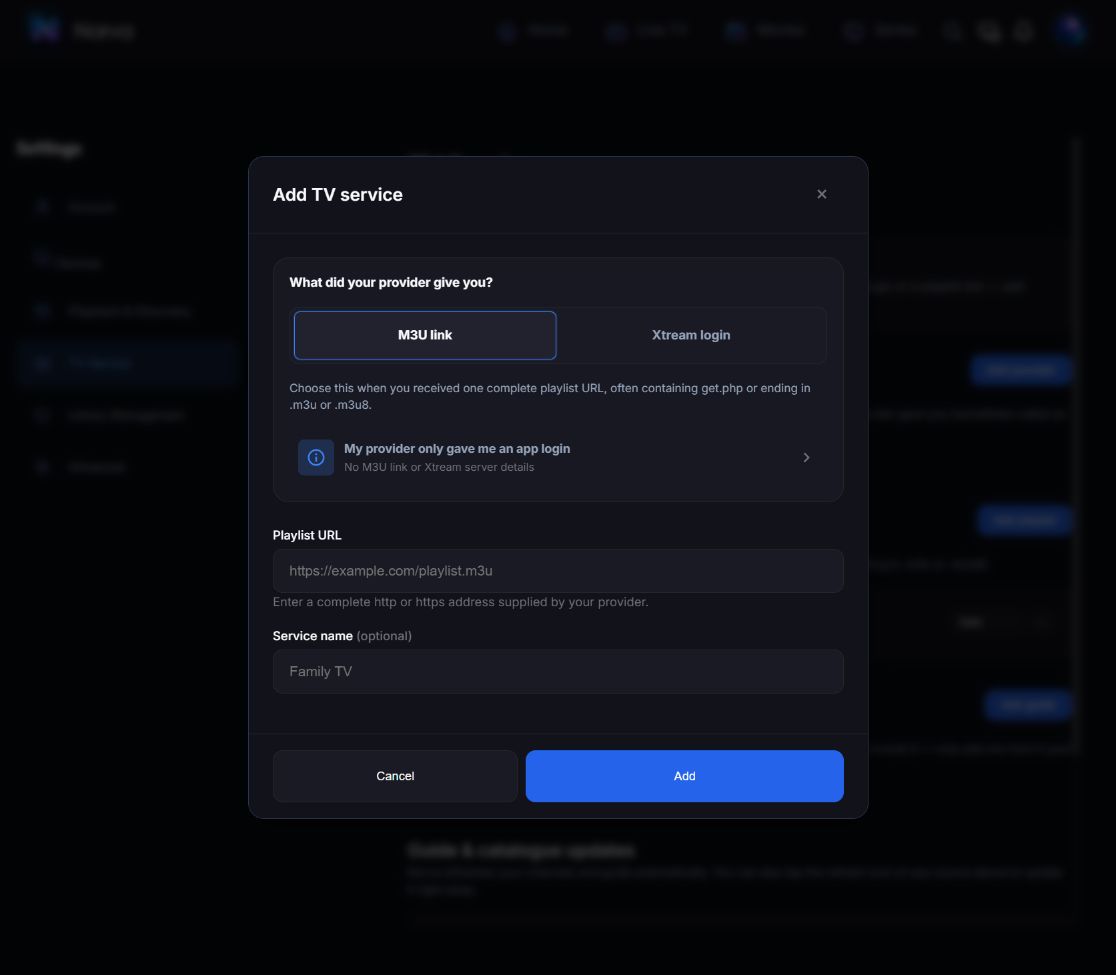
For M3U link, enter the complete address in Playlist URL. Norva's form describes an http or https address and gives .m3u, .m3u8 and get.php as common clues, not proof of permission or compatibility. Service name is optional: a neutral nickname helps distinguish sources without exposing credentials.
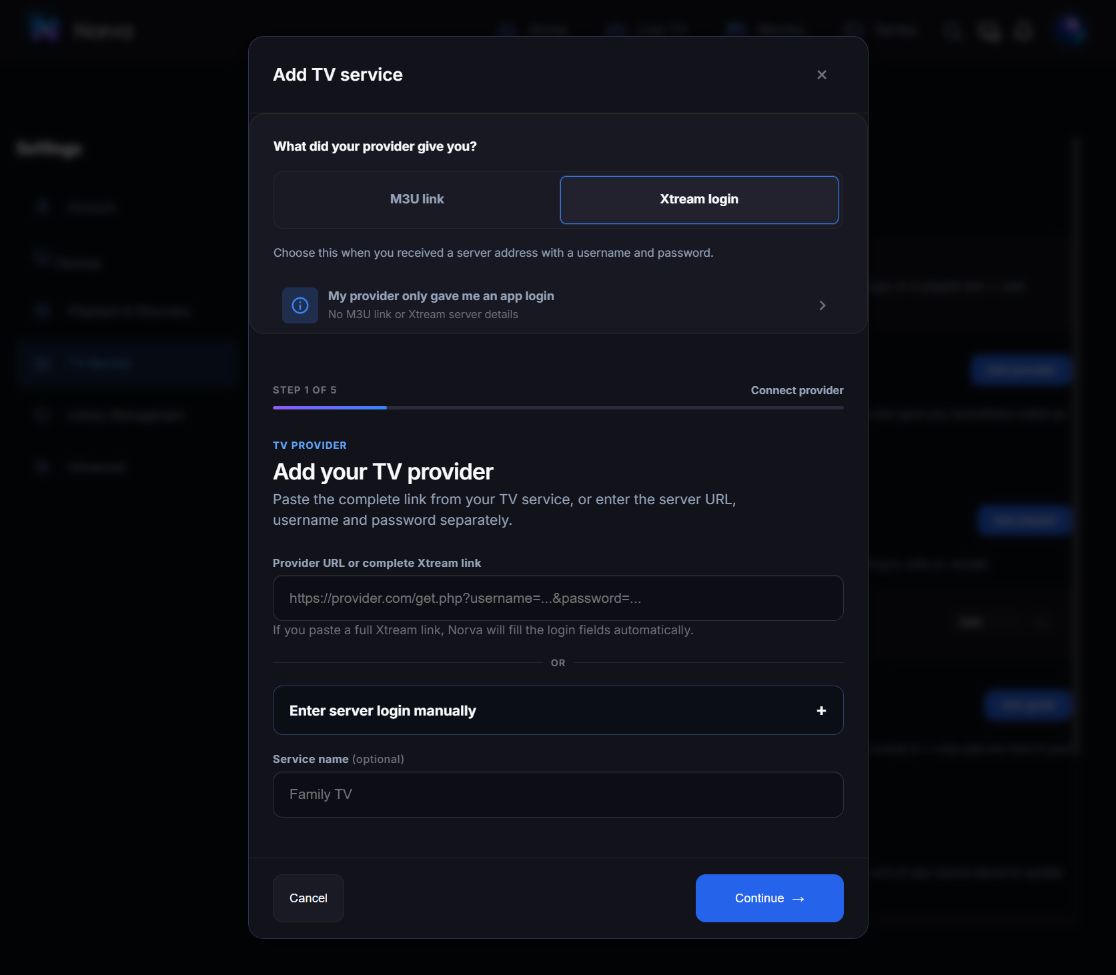
For Xtream login, the current flow begins at Connect provider. Use Provider URL or complete Xtream link, or expand Enter server login manually if that is the format you received. Review each subsequent on-screen step rather than treating Continue as confirmation that the source is already connected.
Match each requested value to the source’s official information. Avoid adding spaces, changing case, or “correcting” an address unless the source documentation instructs you to do so.
Norva’s privacy policy says source settings are used to connect the service to the source on the user’s behalf. Review that policy before submitting sensitive settings.
If you only have an app login
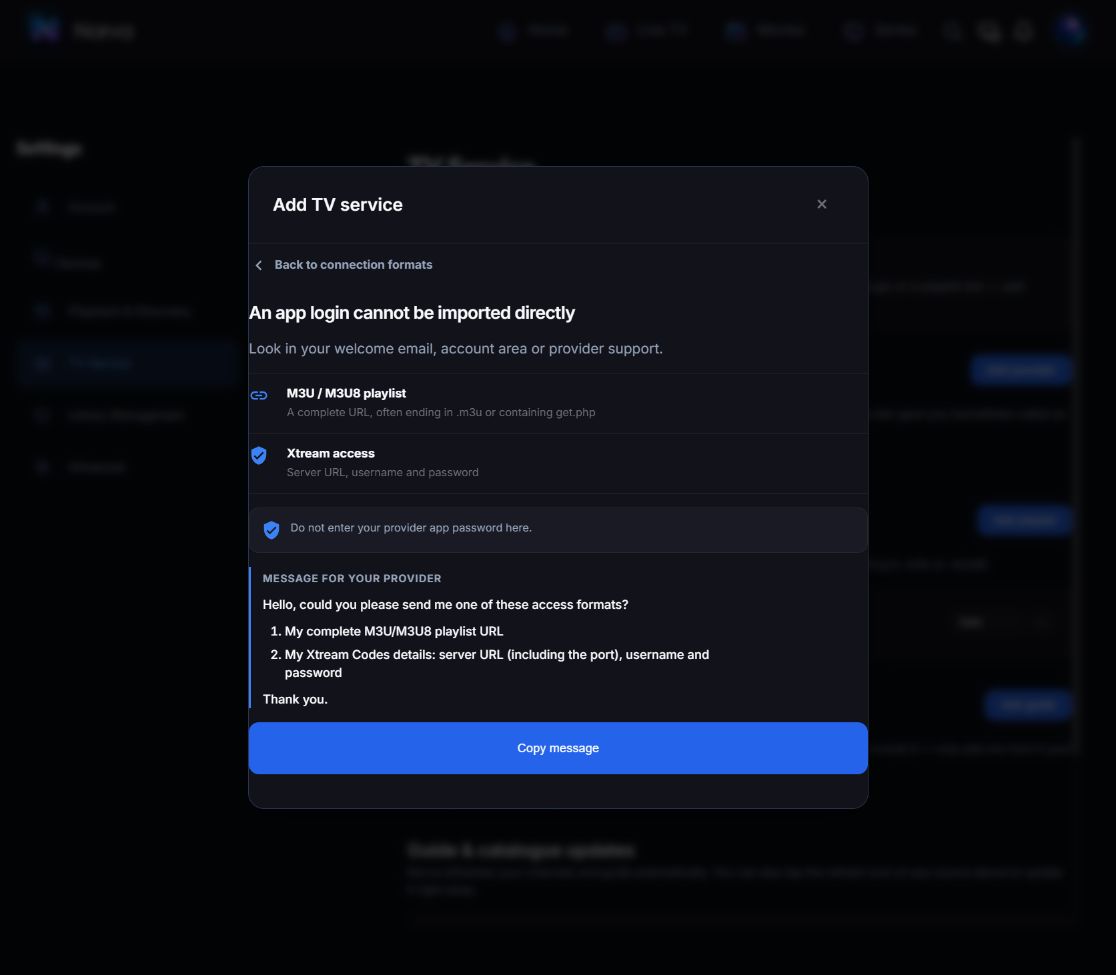
Select My provider only gave me an app login. The help panel explains why credentials for a separate application cannot simply be imported as a Norva source and provides a message requesting a compatible M3U link or Xtream server details. Ask the source owner through their official channel; do not paste passwords into public support posts.
Step 4: enter settings privately
Use copy and paste where practical, then inspect the beginning and end of each non-secret value. Keep passwords, private links, usernames, and tokens out of:
- screenshots;
- screen recordings;
- public support threads;
- analytics notes;
- shared documents;
- clipboard-history tools you do not trust.
If a television makes secure entry difficult, use the documented pairing or account workflow rather than broadcasting credentials.
Observable result: required fields are complete without an exposed secret.
Step 5: save once and allow the first load
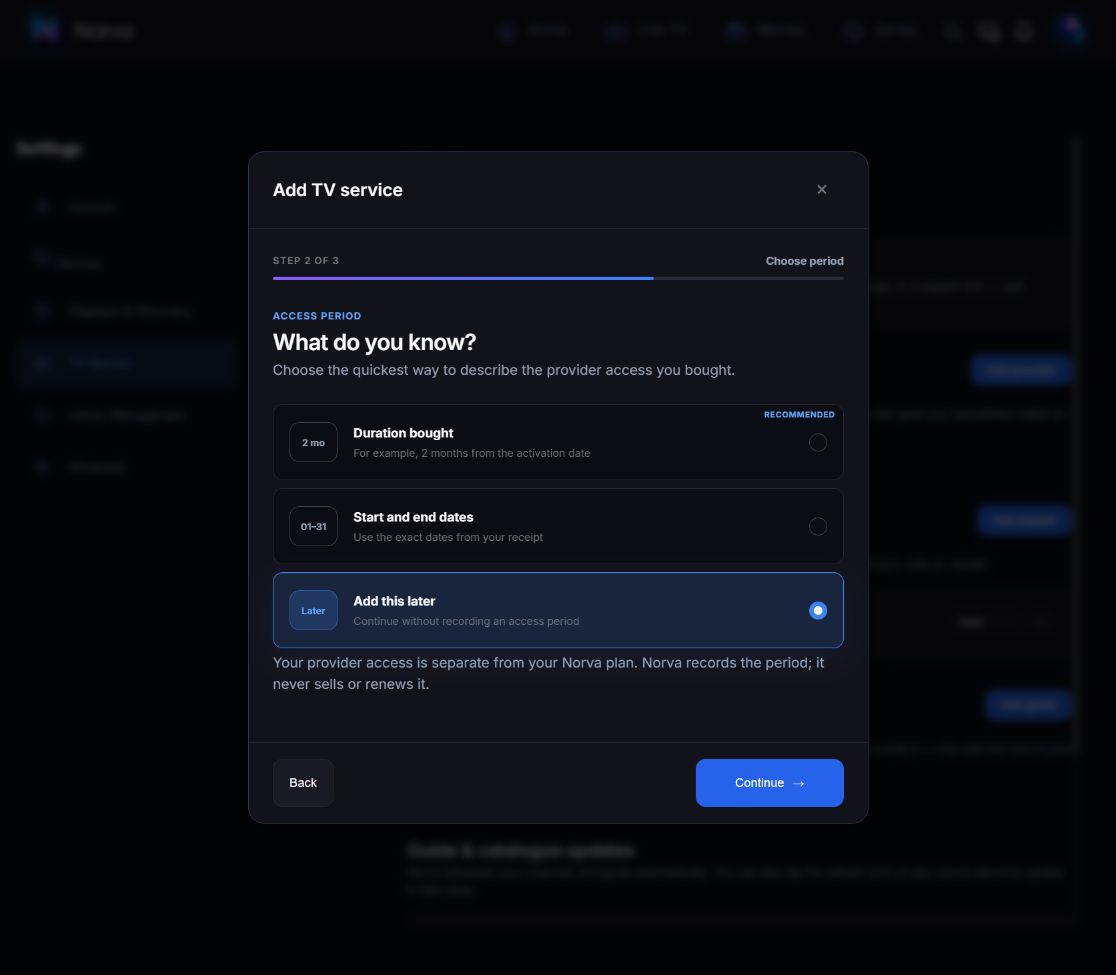
For the M3U form, use Add once after checking the URL. For Xtream, Continue opens Provider access period. The visible choices are Duration bought, Start and end dates, and Add this later. Record only terms you actually know; this is separate from your Norva plan.
In our test, no access dates were supplied, so we selected Add this later, then Continue, reviewed Add later / No new dates, and used Finish without dates once. The step counter changed from five steps to three for this shorter path. Do not invent dates merely to finish setup.
Norva then opened Preparing your catalog, displayed Importing, and marked the connection check as Done. The detected-title counts began to grow while catalogue preparation remained in progress. These are separate observations: accepted credentials do not mean every title is already ready to play.
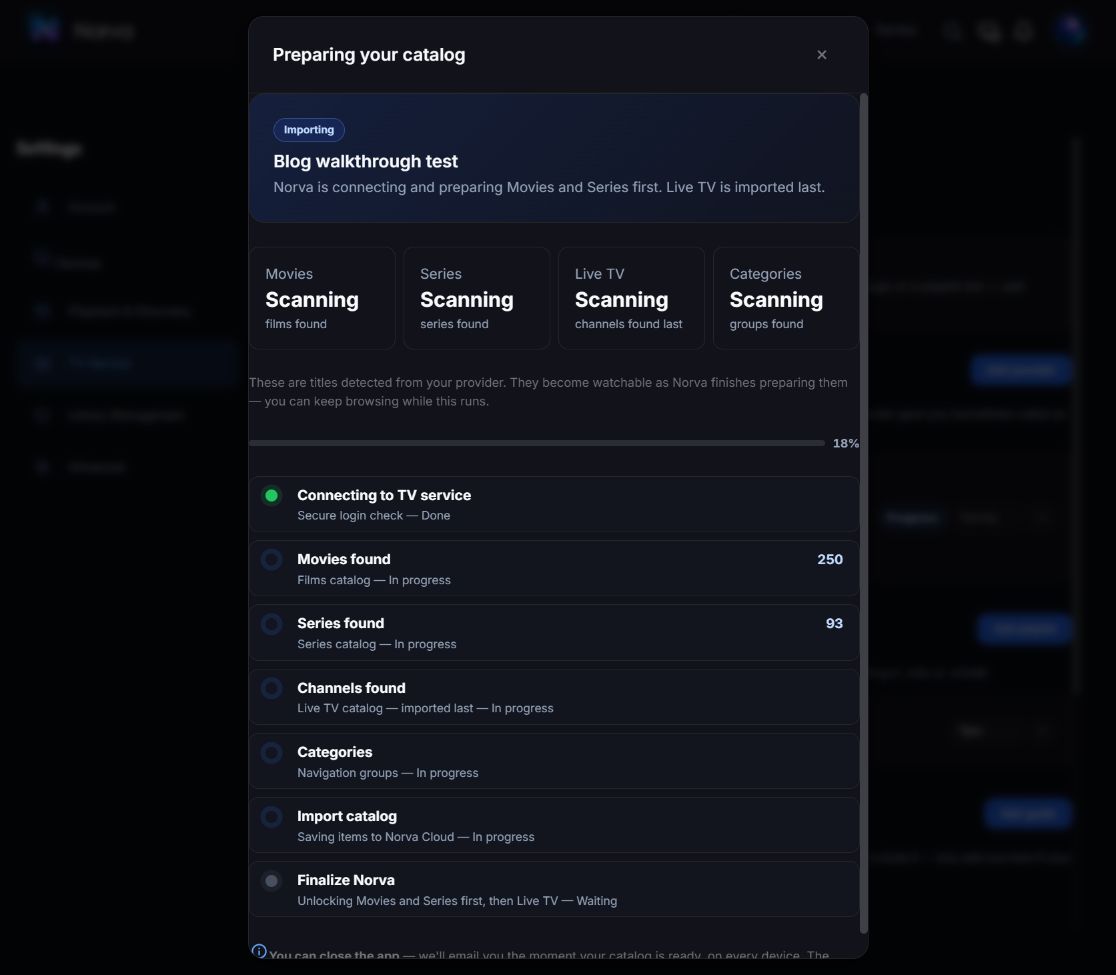
The player may need time to retrieve categories, catalogue information, or guide data. Do not repeatedly submit or remove the source while a normal load is still in progress.
No universal loading time can be promised. Source size, connection, and device can affect the first result.
Observable result: Norva accepts the settings or presents a specific, recordable error.
Step 6: verify a known item
When the library reaches a stable state:
- check the expected top-level section;
- open one expected category;
- search for one known item;
- verify title, year or episode identity where available;
- inspect source-supplied language or subtitle information;
- avoid assuming missing optional metadata means the whole connection failed.
For example, choose one title that the source owner confirms is present. If its category loads but the title does not appear, note that specific result. If it appears but fails to play, catalogue loading succeeded; playback still needs a separate check. Neither observation proves that the entire source is working or broken.
Observed in the follow-up: the same source was marked Ready in Settings → TV Service. We opened Movies, selected Blog walkthrough test in Source, and used Audio language → Albanian. The returned cards displayed Albanian. After Clear all, searching a known title opened its details with twelve versions, a year and a synopsis. No duplicate source or manual resubmission was needed.
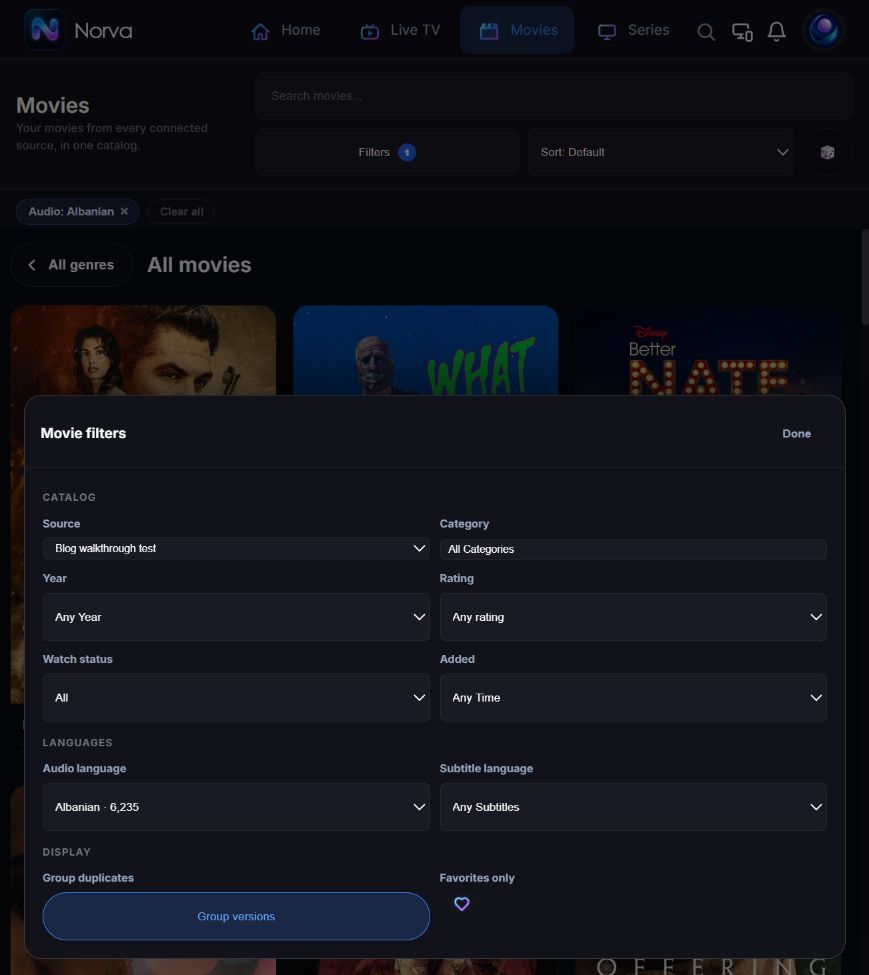
Do not confuse a source label with a verified audio track
The current audio filter brings recognised language labels and detected file-track information into the same browsing control. That makes a source label useful for finding a version, but it does not turn a country, collection name or title prefix into proof of the tracks inside that file. Where actual track information is available, use it to choose the version. A regional indication such as Nordic languages does not identify a single spoken language.
Use a separate check for each layer:
| Visible result | What it establishes | What still needs checking |
|---|---|---|
| The source shows Ready | Norva reports the catalogue as ready | Every item's metadata and playback compatibility |
| A title appears under the selected source | That item can be found in the current catalogue | Other items and the selected version |
| A source category appears | A grouping label was received | Whether a verified film genre is available |
| A language filter returns a version | Available language information matched the filter | Actual selectable tracks in that file and player |
| Language unidentified | No usable audio-language result is being displayed | Actual track availability and analysis status |
| The player page opens | Navigation to the player worked | Video frames, advancing playback and usable audio |
The latest follow-up tested catalogue navigation, not video playback. An earlier setup attempt opened the player without establishing advancing video before returning Back. We therefore do not present the Ready state, language badges or artwork as proof that a viewing session succeeded.
Step 7: test one account action
Add one favourite or save a small amount of playback progress. Return to the library and confirm the visible state.
This tests the difference between source data and account context. It does not prove that every item, format, or device is compatible.
Our test favourite was present when the catalogue was opened again later. We then removed it and reloaded to confirm the original state. The immediate return from details had not shown the updated state, so this observation validates persistence for that item, not instantaneous feedback or cross-device synchronisation.
The broader first-session plan is Getting Started With Norva.
If the connection is partial
A partial result is more informative than “it does not work.” Record which layer succeeded:
- Were settings accepted?
- Did any categories appear?
- Did titles load but artwork fail?
- Did catalogue information load but guide data remain empty?
- Did one known item open?
- Did playback fail only on one device?
Change one variable at a time. Recheck source details before reinstalling the app. Preserve a redacted screenshot of the error only after confirming it contains no credentials.
Security and account clean-up
After a successful setup:
- review trusted devices;
- remove any device you no longer control;
- keep the source record private;
- note where permission and terms can be reviewed;
- disconnect the source if authorisation ends;
- change exposed credentials through the source owner’s official process.
Norva’s privacy and account-deletion pages describe controls available for Norva account data.
Limitations
A successful connection does not mean every source field is complete, every media format works on every device, or offline access is available. Languages and subtitles depend on the source and media. Offline use depends on device, source, and associated rights.
The evidence covers current web controls, one Xtream submission, a later Ready state, source-specific audio filtering, search/details for one title and a favourite's persistence/removal after reopening. It does not establish that every catalogue record is complete or playable. Successful playback and immediate favourite feedback were not validated. No M3U import, native phone/TV flow, offline use or cross-device continuity was accepted by this web test.
Frequently asked questions
Why should I add only one source first?
It provides a clean baseline. If a category, title, or error appears, you know which source produced it.
Should I share a connection screenshot with support?
Only after redacting every password, private link, username, token, and personal identifier. Use Norva’s official support route.
What if Norva accepts the settings but nothing appears?
Wait for the normal initial load, then verify the details and connection. Record whether the result is completely empty or partially loaded before contacting support.
Your next step
Open Norva and connect your source
After signing in, use the account menu, Settings, then TV Service as shown above.